r45_m7_sample_bringup
M7 Bringup Steps
Yocto Configuration
- Add
m7-samplepath to filem7-sample.bbas shown below:
- Add the required cross-compilation toolchain to file
cortex-m-toochain.bb
m7-samplewill be compiled into the image under namem7-boot,this is shown in the figure below:
- next you should add the
DISTRO_FEATURE:append = "m7-boot"tobuild\conf\local.confas shown below:
- and then you can use command
bitbake m7-sampleto build them7-sample.bbfor generate the sdcard file.- Notice: if you want to build your own new code add in
m7-sampleproject underbuild/tmp/work/cortexa53-crypto-fsl-linux/m7-sample/1.0-r0/gitonly,
you can use the commandbitbake m7-sample -c do_compile -fto build it.
- Notice: if you want to build your own new code add in
Pre-analyze fip.s32-sdcard.m7
Before analyzing the mirror, it is necessary to understand the structure of the IVT, as shown below:

Application boot as shown below:

Example
fip.s32-sdcard.m7information as shown below:
IVTtable shows that the entry address of theivt headeris0x1000, and theApplicatioin boot entry pointer addressis0x1200( store the application boot ram address)
Application boot image structure(BOOT_SEQ=0) as shown below:

From the
Application boot image structureand you can find theRAM_start_pointer,RAM_entry pointerandCode_len;
M7.binactual size is0xdbe0as shown below:
M7.binstart address as shown below:M7.binend address(start address + actual size) as shown below:
fip.binas shown below:
0x11240is thefip.binstart address
fip.binsize is0xf0690
SIR-4k 内部长期工作计划
- 平台工作计划
1.1 BSP
Uboot 网络移植;
服务器编译环境配置;
BSP 的前期修改点集中到 meta-sinpro 层;
升级到 BSP37;
升级方案实现及优化;
SD卡方案;
flash;
生产;
kernel、文件系统裁剪;
启动时间优化;
FDMA 驱动支持;
M核、A核 boot 过程;
1.2 APP
lax 算法部分与BSW解耦;
SBC 基本功能实现;
线程优先级优化
1.  线程调度策略选择;

2.  测试系统实时性;
- 代码规范化
1.  参考《c编码规范》;

2.  注释风格统一;
- 功能模块解耦合 2023.12.11——2023.12.15
1.  优雅消灭全局变量;

2.  过期模块删除;

3.  数据产生与 dataConvert 模块的内存解耦,中间要有映射层,比如点云;

4.  BSW 工程与 DSP 工程之间禁止直接 extern;

5.  对外结构体与算法内部结构体解耦;

6.  DSP 和 BSW 工程的代码不应该相互extern来共享变量、函数;

7.  DSP 必须要在 BSW 申请吗?
log 模块
capture 采集失败与 dsp 处理配合
全局 error 码,为 faultlist 做准备
进程、线程优先级以及核独占
时间同步
监控模块
1.  统计算法模块时间;

2.  监控关键节点时间,配合上位机显示,可视化雷达运行情况;
dsp库、感知库编译成动态库;
lib、bsw工程构建优化
1.  构建优化(spt库、radar\_library合并),同时编译bbe32

2.  bsw 工程要同时编译app、bbe32
- spt
1.  驱动优化,丰富的错误信息返回;

2.  算力优势(相比其他核);
- bbe32
1.  A53直接调用BBE32;

2.  BBE32 log 信息输出;

3.  算力优势(相比其他核)
- lax
1. 算力优势(相比其他核)
cte
APP 热重启支持
感知下片
SRAM、DDR优化
1.  测试SRAM、DDR性能数据;

2.  SRAM 最大利用率优化;
- RSDK更新
1. 是否可将RFE, SPT/LAX/BBE32 驱动部分与APP部分分离
1.3 M7 相关开发
2. 客户工作计划
2.1 博世
| 内容 | 详细说明 | 计划时间 | 完成状态 |
|---|---|---|---|
| gptp |
001-Yocto 总结分享
1. yocto 之前
Linux 底层BSP开发主要围绕三件事情,U-Boot、Kernel、Rootfs。在没有 yocto 构建工具之前都需要手动编译处理。
构建 U-Boot
配置交叉编译工具链;
执行 make xx\_defconfig,配置 U-Boot;
执行 make ARCH=arm CROSS_COMPILE=arm-linux-gnueabihf-,编译 U-Boot;
构建 Kernel
配置交叉编译工具链;
执行 make xx\_defconfig,配置 Kernel;
执行 make ARCH=arm CROSS\_COMPILE=arm-linux-gnueabihf-,编译 Kernel;
构建Rootfs
- 手动下载源码编译环境需要的库、应用
手动处理有一个最大的麻烦就是处理依赖,往往安装 A 软件时,发现 A 软件依赖 B 软件,装 B 软件时,又发现依赖 C 软件,这样无穷无尽。
busybox;
生成 SD/Flash 镜像
一般根据某一个 layout 规矩,执行脚本把上面三者打包到一起。
2. yocto 之后
仅仅执行一个bitbake fsl-image-auto,上面所有的工作均自动完成,当然简单的背后是有一堆配置文件来支持。
解决了之前的哪些痛点
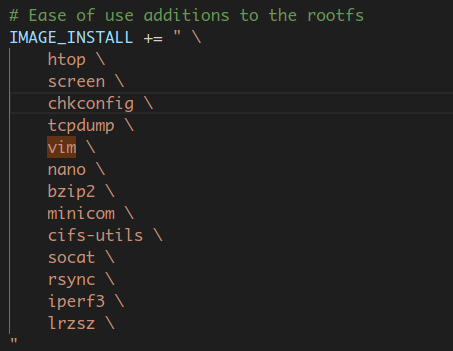
- Rootfs 软件依赖问题;
例如增加 vim 软件,只需要在配置文件中添加即可。
- 芯片厂商更新合并的问题;
yocto 以 patch 来管理源码,所有在源更新后,很容易把自己的 patch 打进去,如下。
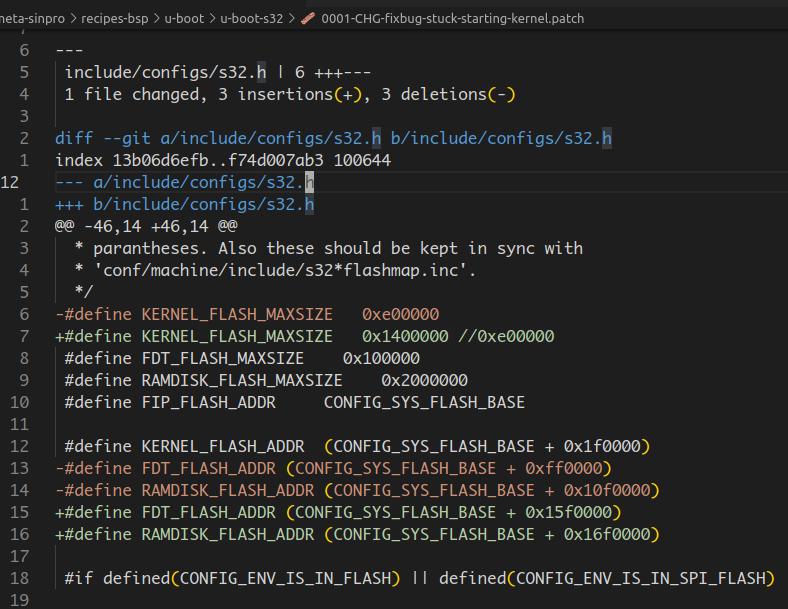
方便芯片厂商管理多个平台。
至于对 U-Boot、Kernel 构建帮助不大,因为他们本来利用 Kconfig/Kbuild 系统使得构建工作已经很简单了,yocto 也只是在其上又包裹了一层。
带来了哪些问题
编译构建对机器配置、网络均有要求;
概念很多,学习曲线陡峭;
官方文档
https://docs.yoctoproject.org/current/index.html
3. yocto 基本原则
- yocto 目录结构

sources/ 核心目录,包含所有构建过程需要的所有的配置文件;
build_s32r45evb/ 包含编译过程中的源文件、中间文件以及最终镜像文件,整个文件夹都是由 sources文件夹里的配置文件控制的;
downloads/ 包含编译过程中从网络下载来的文件,下次需要可以直接从本地取得;
sstate-cache/ 编译过程中得cache;
yocto 工作流程
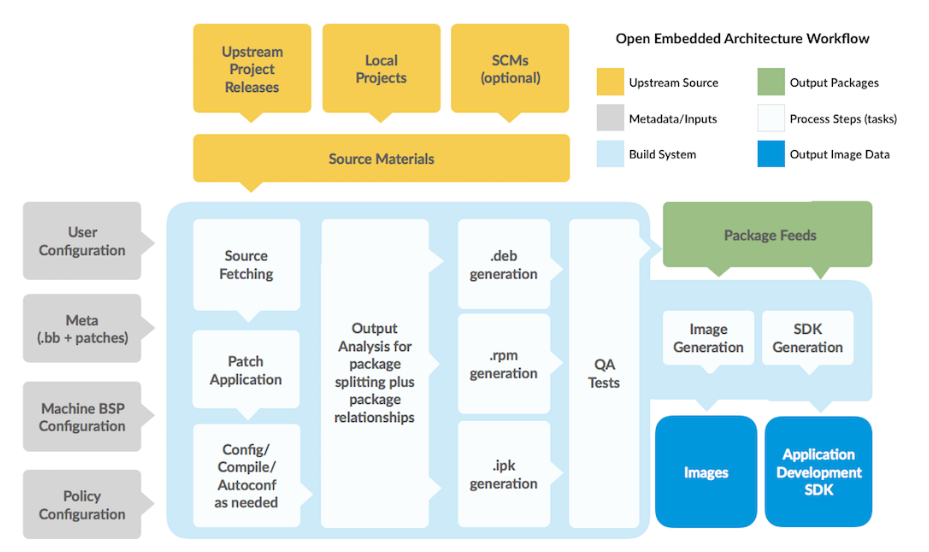
Fetch – get the source code
Extract – unpack the sources
Patch – apply patches for bug fixes and new capability
Configure – set up your environment specifications
Build – compile and link
Install – copy files to target directories
Package – bundle files for installation
source 目录以及重点文件的作用

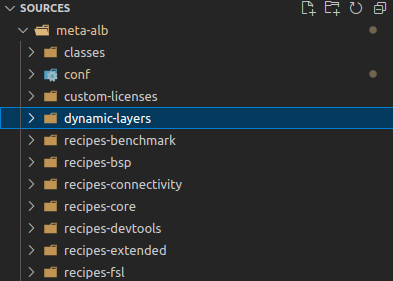
每一个meta-*文件夹,yocto的语言叫做 layer。功能紧密关联的 recipes 组成 layer,layer之间功能相互独立也有依赖性。
我们 r45 平台主要关注 meta-alb、meta-rsdk 两个目录,这两个目录和meta-freescale由 NXP 维护,其他某些目录由社区维护。meta-sinpro目录是我们新建的,我们的工作都体现在这个文件夹里。
- layer 目录
classes:该文件夹下的.bbclass文件,包含了一些在不同的metadata之间共享的信息,以及编译信息的抽象;
conf:该conf文件夹下的layer.conf文件定义了该metadata中使用的哪些.bb、.bbappend文件等参与构建嵌;
recipes-xxx:该文件夹中有许多的.bb或.bbappend文件,这些文件定义了构建系统需要的软件包或源码等,主要包括:
软件包的基本信息:作者、主页、License等
版本信息
依赖文件
从哪下载以及如何下载软件包
软件包补丁信息:是否需要补丁、补丁下载地址及方式等
如何配置、如何编译软件包、安装位置等
Machine
R45 的 machine 文件 s32r45evb.conf,如下:
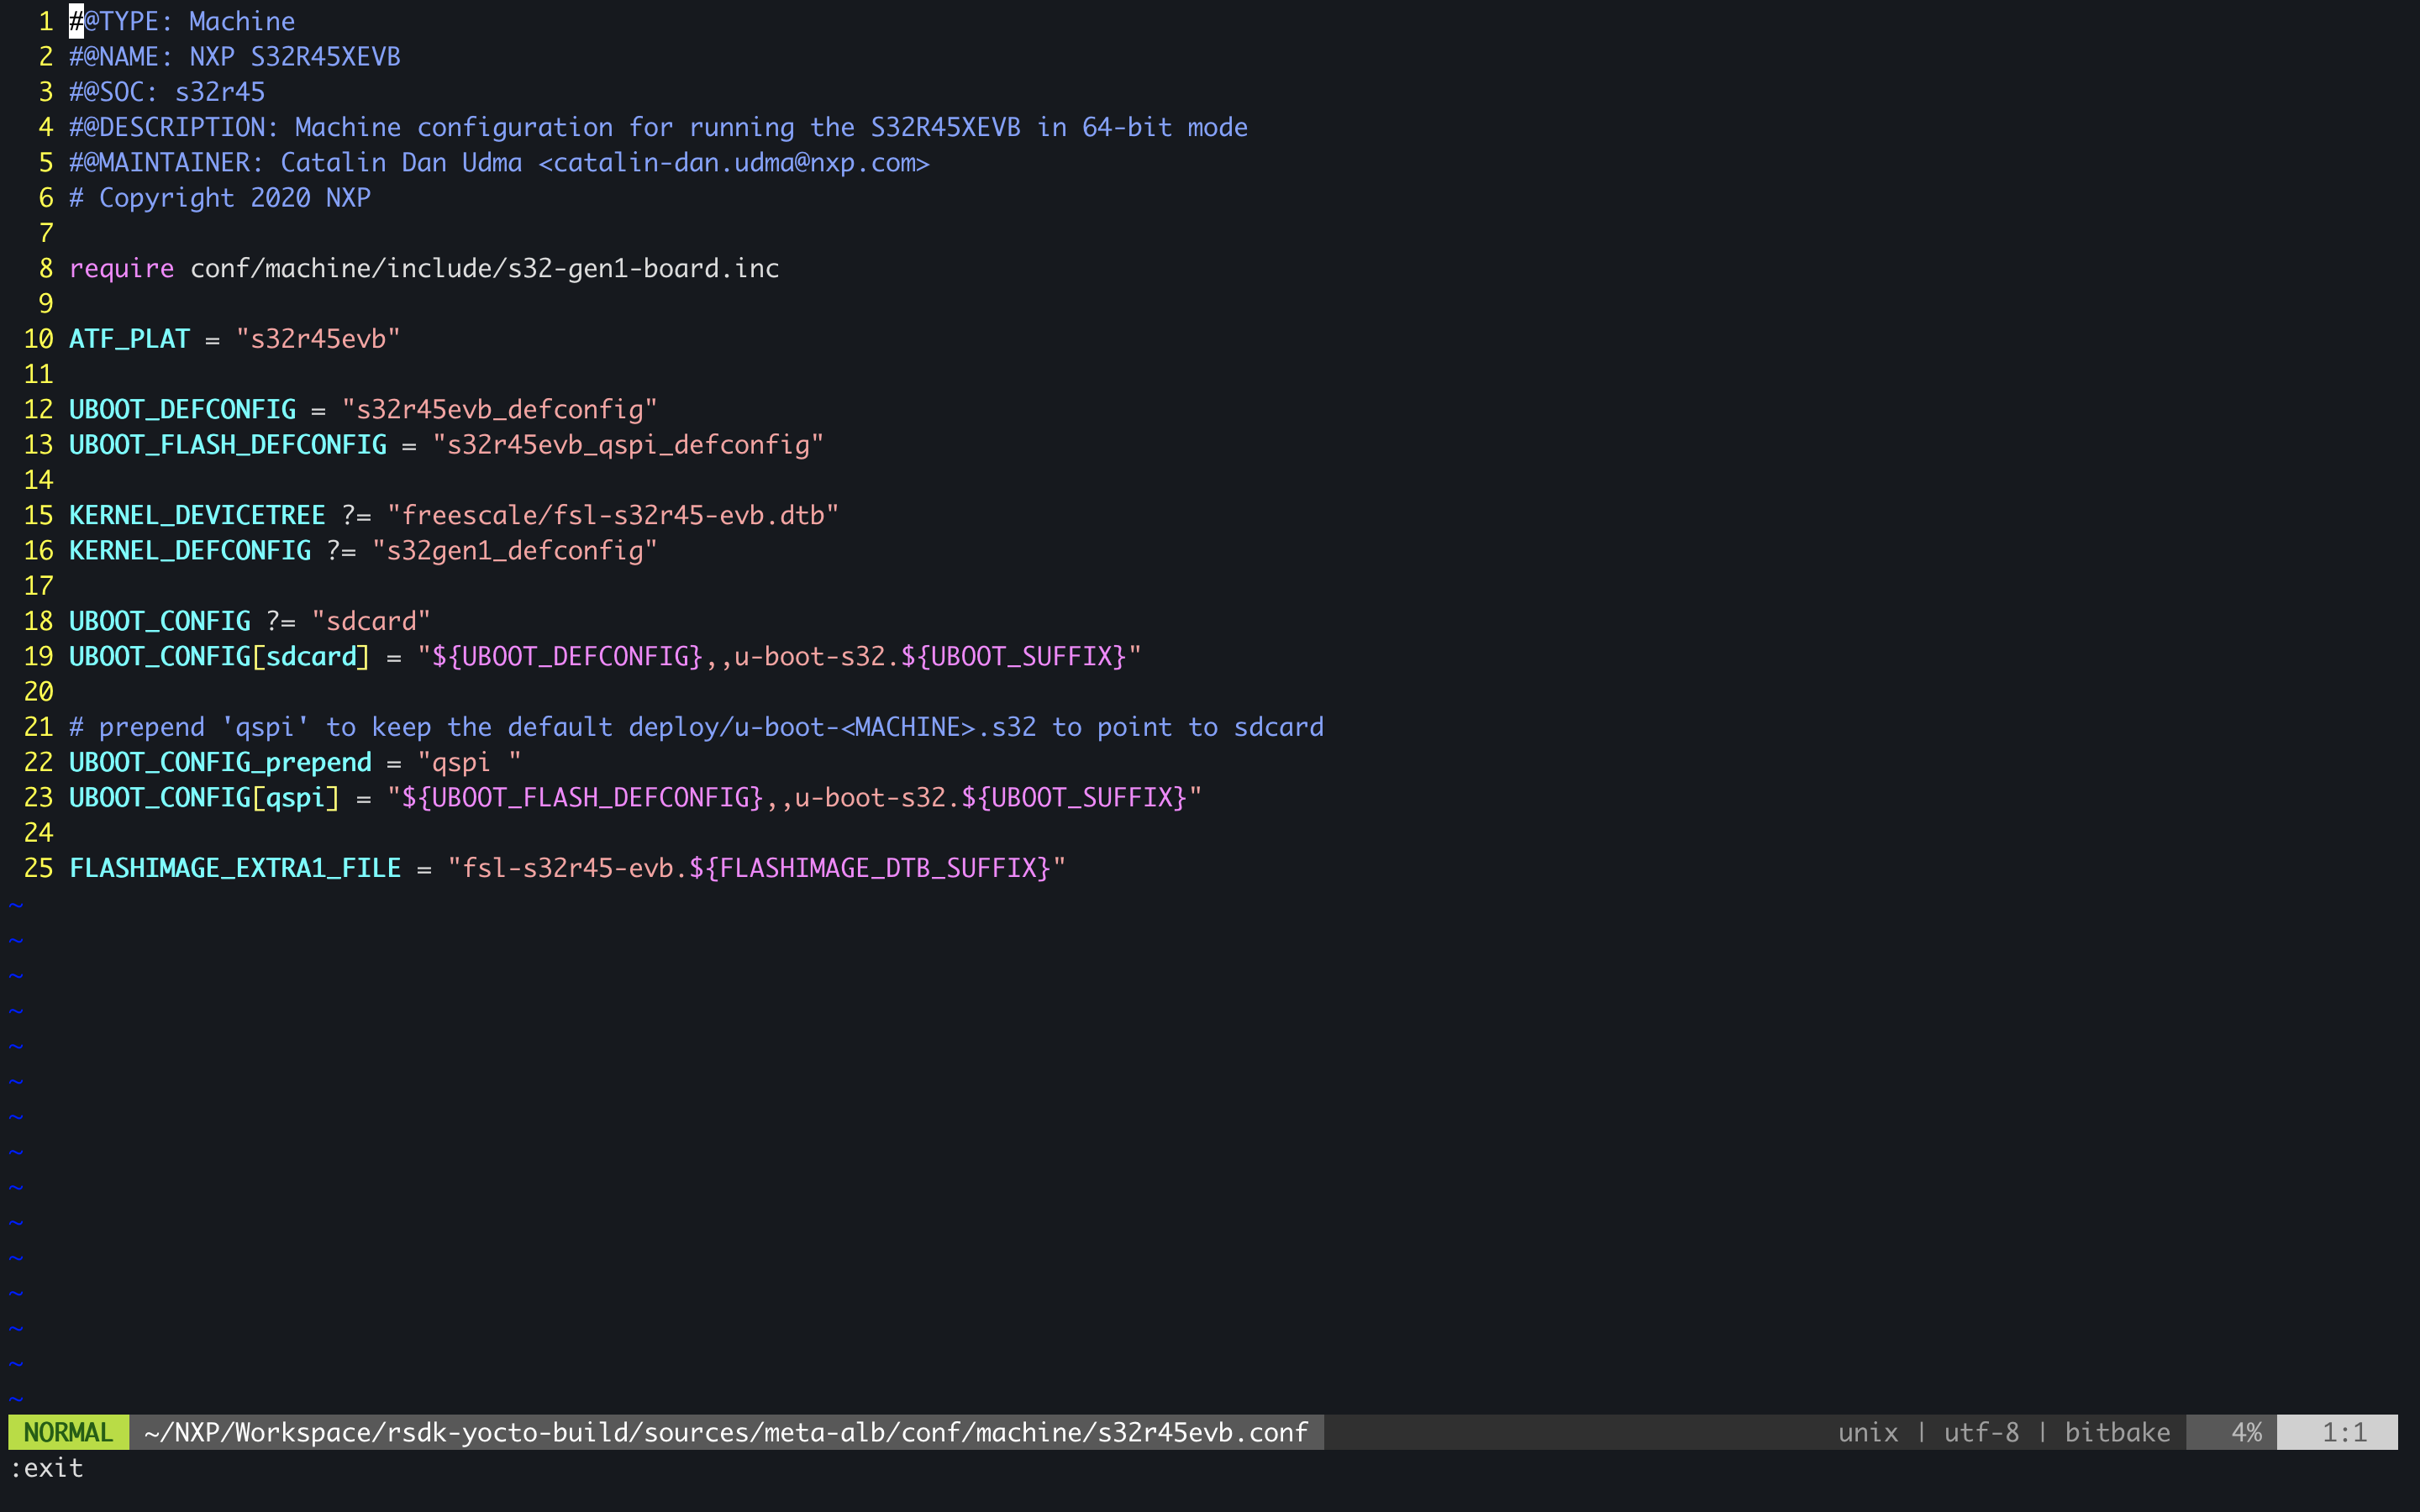
主要对 U-Boot、Kernel 的行为做一些默认配置。
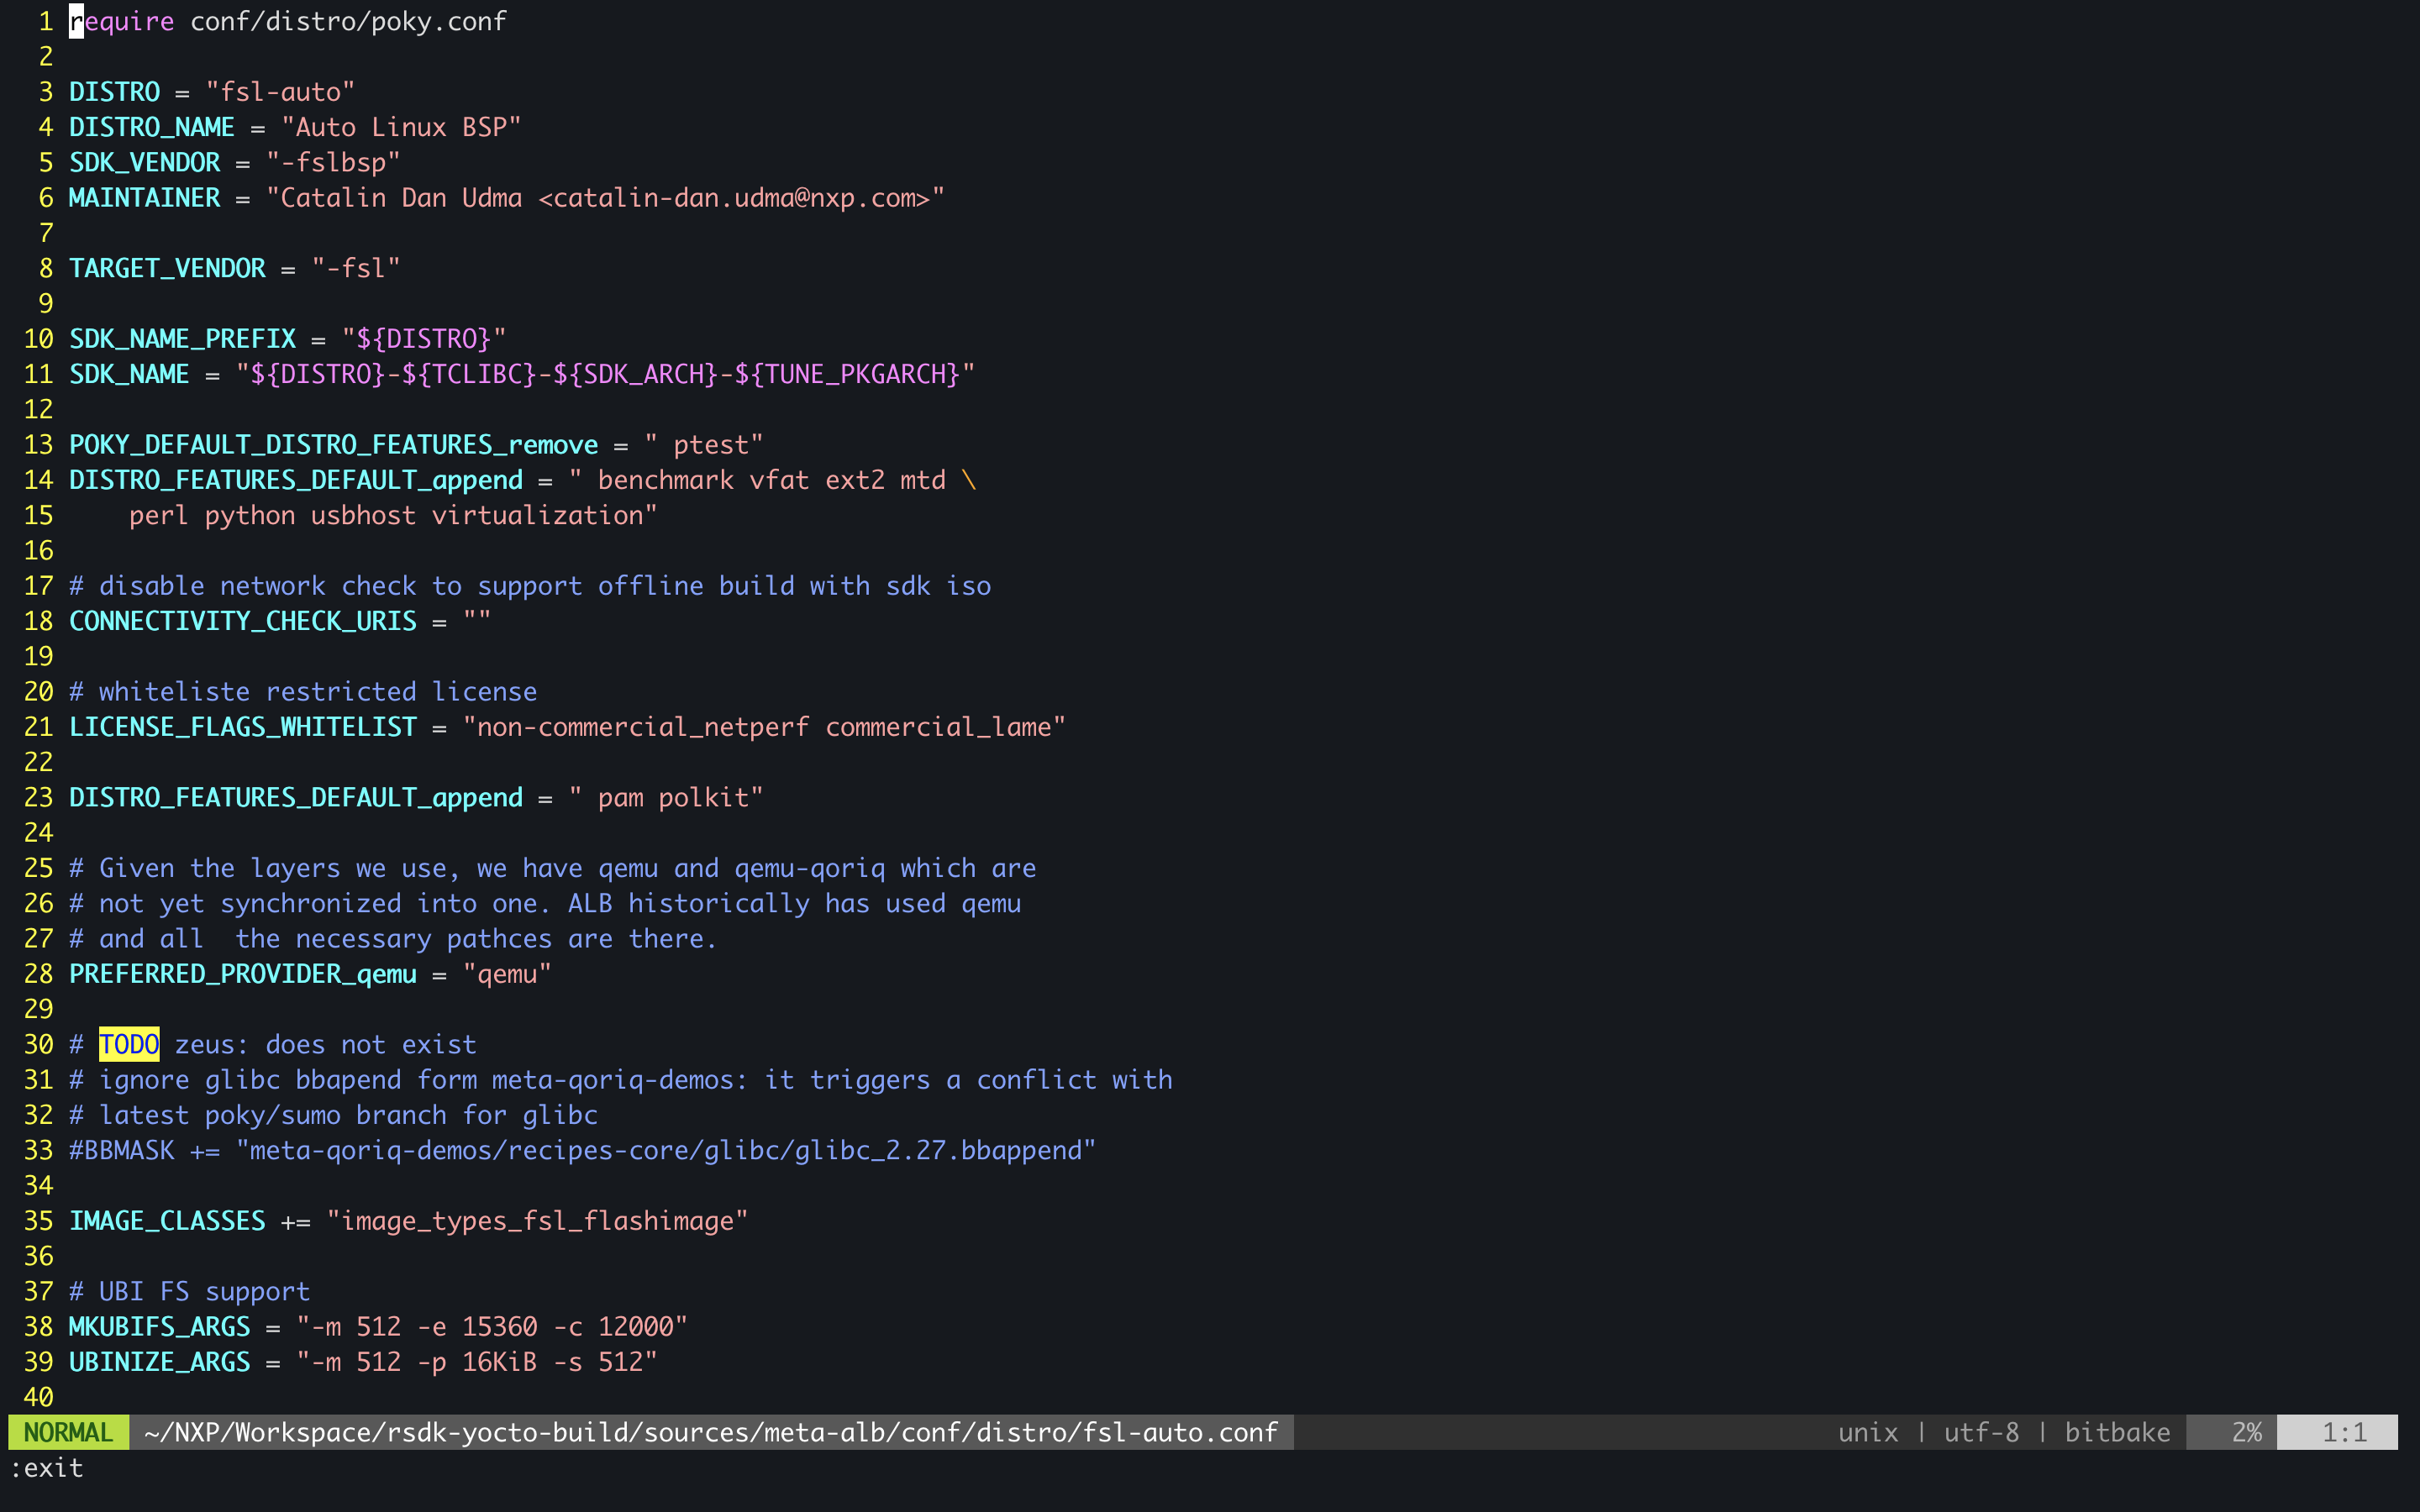
- Distro
Distro 的配置文件主要对发行软件做一些控制。R45的 distro 文件如下:
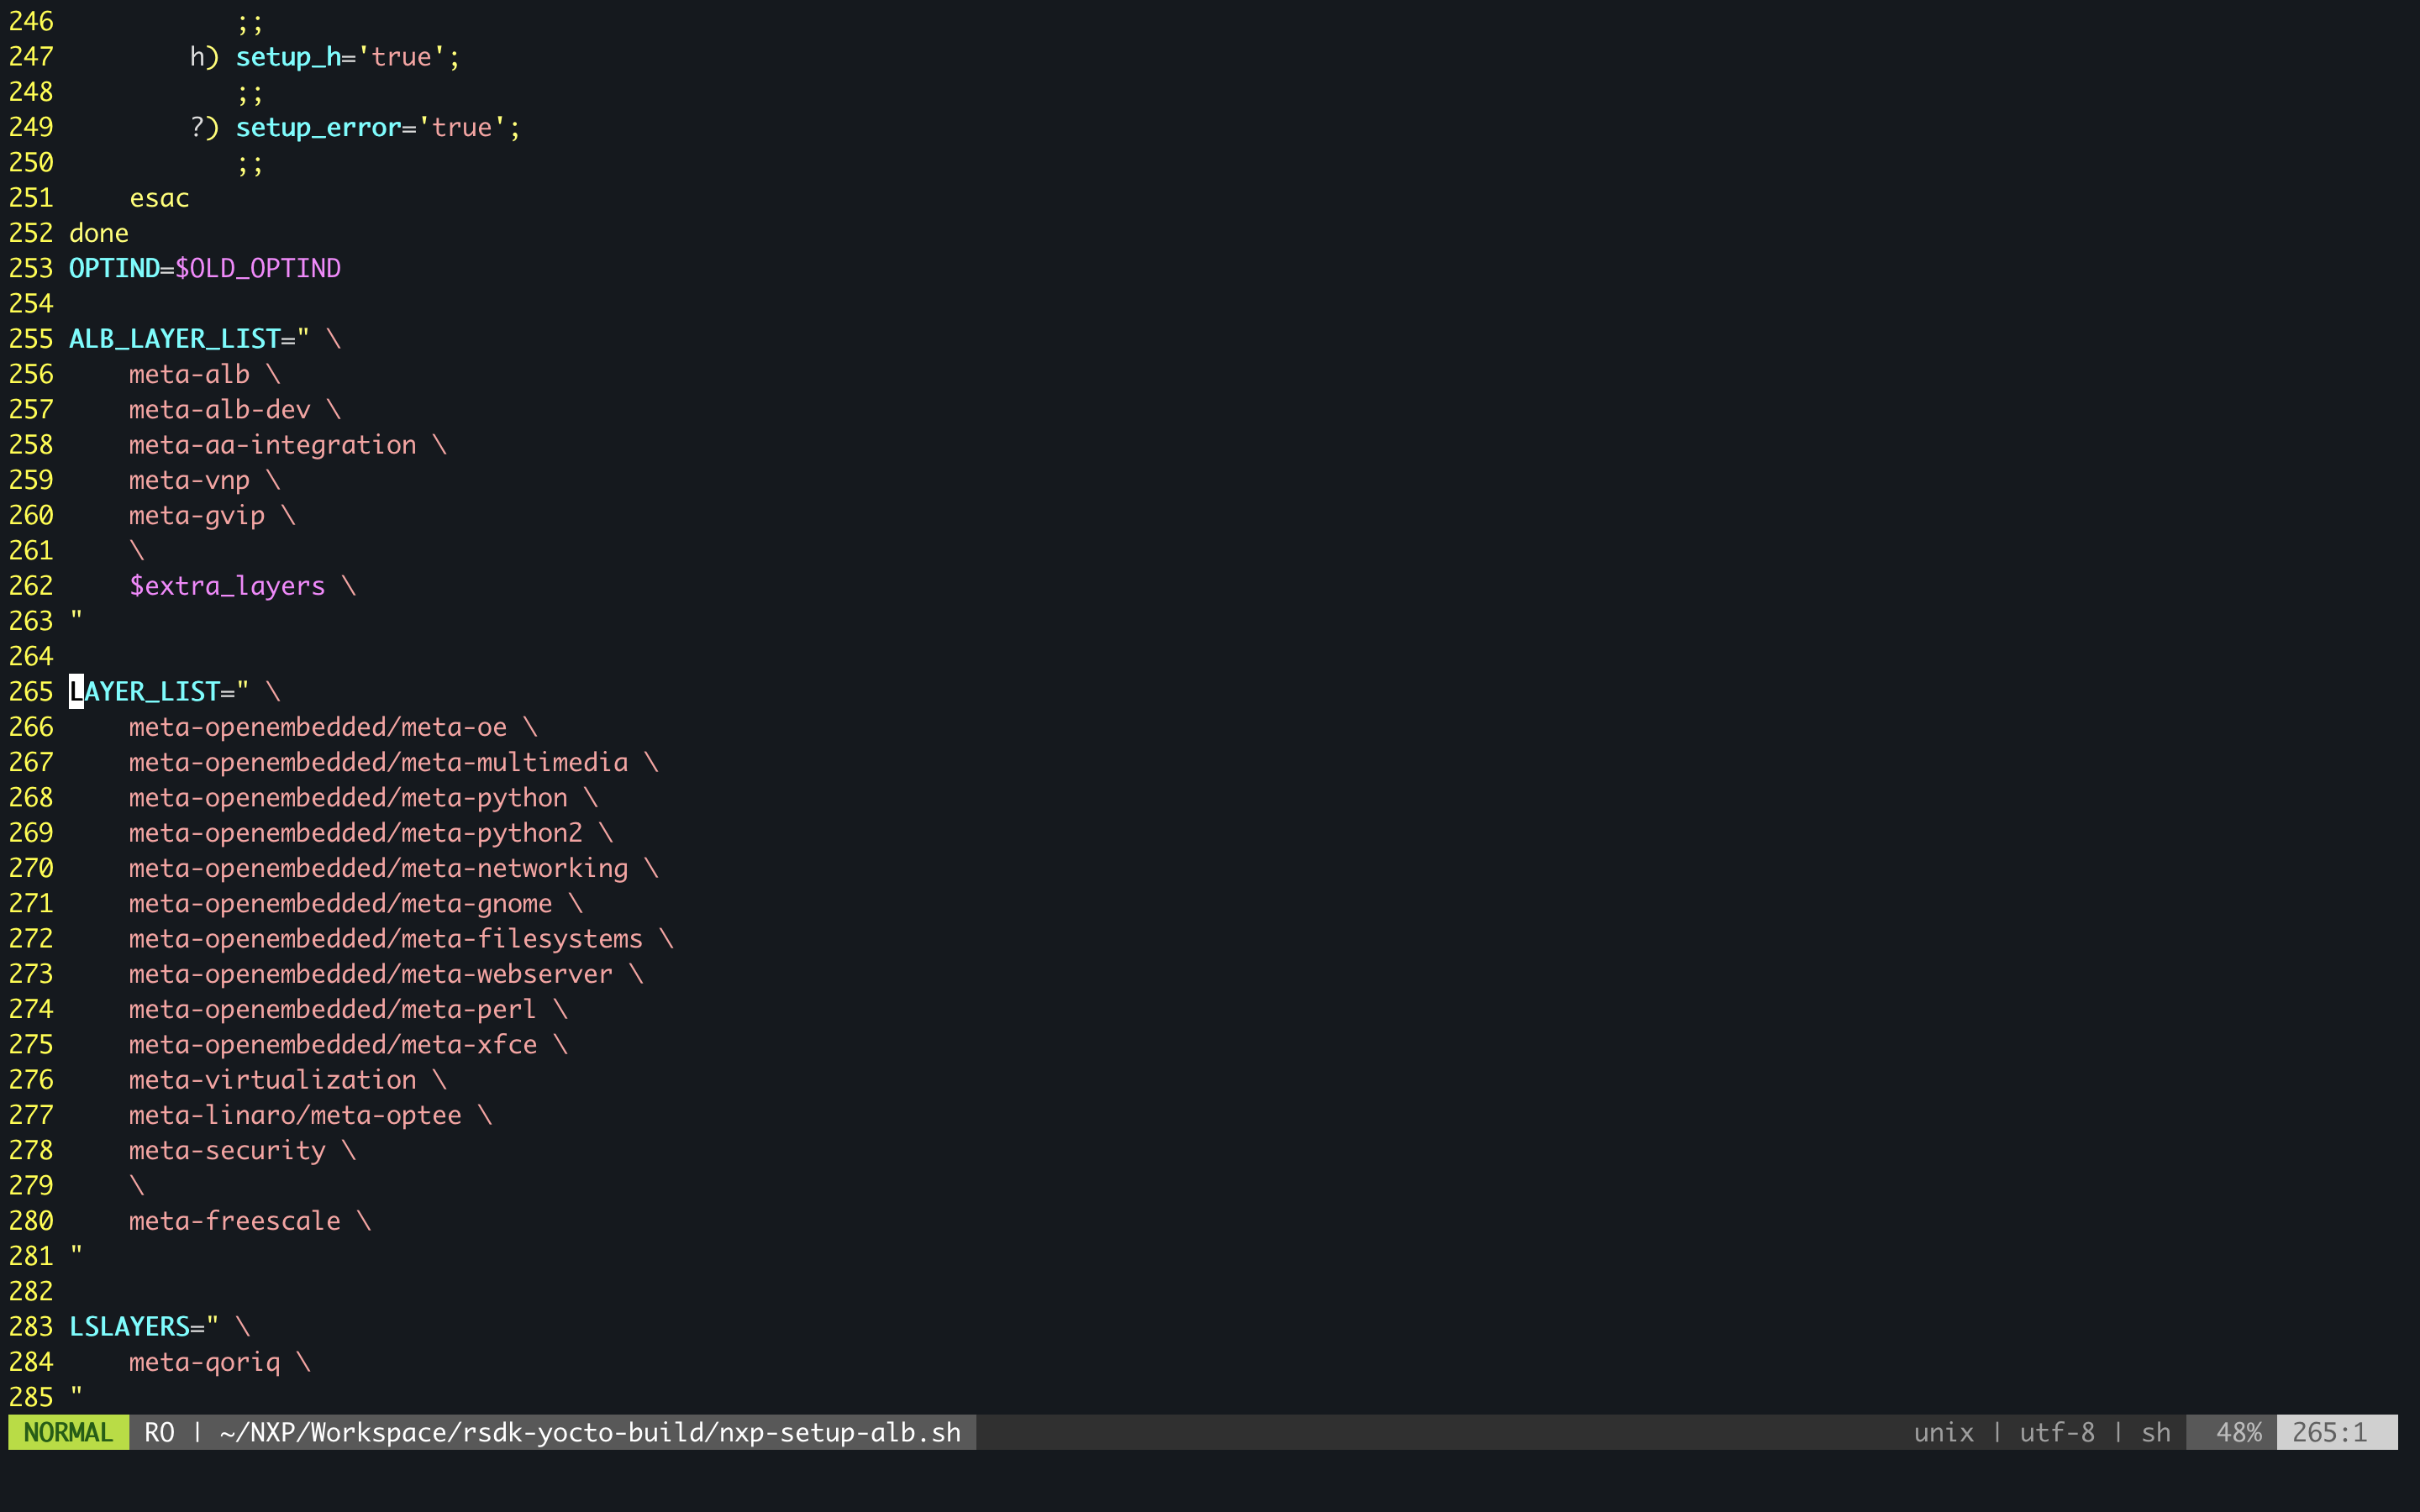
- 使能 layer
在 nxp-setup-alb.sh 文件中添加指定的 layer 可以实现自动添加,也可以手动在 local.conf 文件中添加。
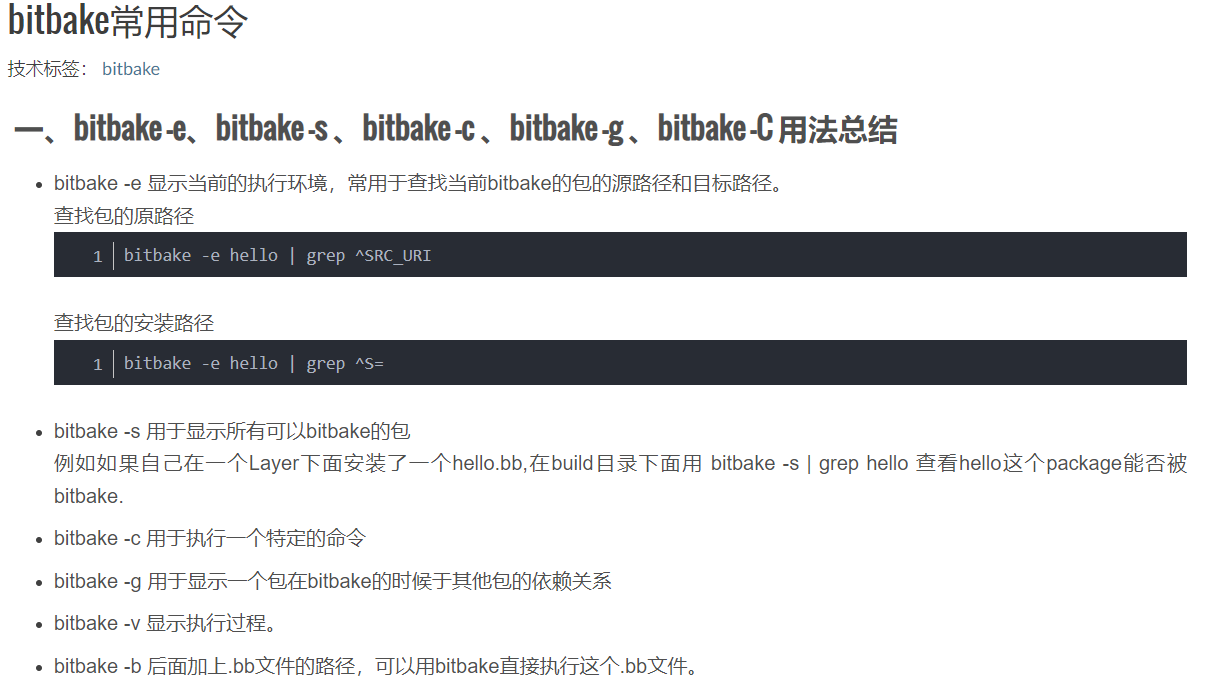
- Bitbake
bitbake 是 yocto 系统的构建工具。可以简单的认为它类似 make 工具,make 工具的行为是由 Makefile 决定的,而 bitbake 的行为是由 .bb、.bbapend文件决定的。bitbake 的命令很多,可以执行bitbake -h 查看或者参考链接 https://docs.yoctoproject.org/bitbake/2.0/index.html
bitbake 常用命令不完全举例如下:
4. yocto 实践
- 新建 sinpro layer
yocto 以补丁的形式(包括源码和配置文件)关联不同的layer,所以我们不会直接改其他 layer。我们所有的定制都在meta-sinpro层完成。新建 layer 的具体过程如下,且测试驱动的编译:
$ bitbake-layers create-layer ../sources/meta-sinpro
$ cd ../sources
$ cp -rp ../poky/meta-skeleton/recipes-kernel/ .
$ bitbake hello-mod; #(hello-mod 是.bb文件的名字,与源文件名无关)
改 U-Boot 源码(手动)
进入 ~/NXP/Workspace/rsdk-yocto-build/build_s32r45evb/tmp/work/s32r45evb-fsl-linux/u-boot-s32/2020.04-r0/git 修改代码;
bitbake u-boot-s32 -c clearnsstate && bitbake uboot-s32 重新编译;
验证 patch 是ok;
git commit 提交这次修改;
git diff 生成 patch;
把 patch 拷贝到 meta-sinpro中,并修改相关 .bb 文件;
改 U-Boot 源码(自动)
所谓自动实际上是用 devtool 工具,具体操作如下:
devtool modify u-boot-s32,会在build目录下生成workspace目录,并把u-boot-s32的源码提取到此处;
修改源码;
devtool build u-boot-s32 编译uboot;
git commit 提交版本;
devtool finish u-boot-s32 ../meta-sinpro,自动提交patch到指定layer;
5. tips
- 下载 repo 改清华源
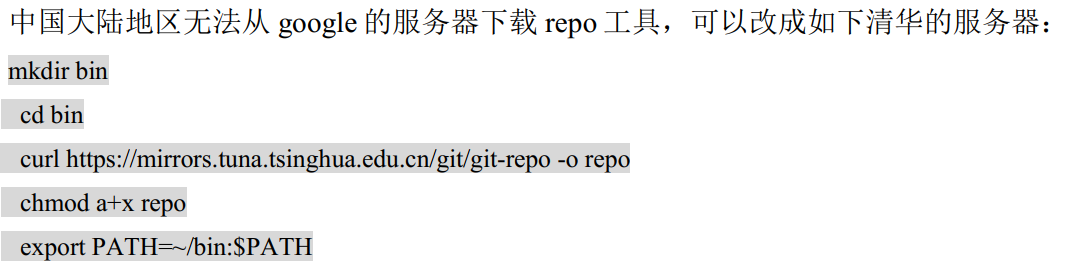
下载NXP bsp 改清华源
- 下载NXP bsp 改清华源
repo init -u https://source.codeaurora.org/external/autobsps32/auto\_yocto\_bsp-b release/bsp32.0**--repo-url=https://mirrors.tuna.tsinghua.edu.cn/git/git-repo\*\*
- bitbake中断后继续报错
中断后会生成 .lock 文件,重新接着编译会出错,删除.lock文件就好了。
- git 仓库默认协议下载慢
指定https协议,有时候会快很多,操作如下:
URL ?= “git://source.codeaurora.org/external/autobsps32/linux;protocol=https”
参考网站
开源 layer: http://layers.openembedded.org/layerindex/branch/master/layers/
Yocto 官方文档,搞懂yocto,这个文档要多看: https://docs.yoctoproject.org/index.html
003-2.5G PHY配置
1. 改启动配置
• 改hwconfig为如下:
hwconfig=pcie0:mode=rc,clock=int;pcie1:mode=sgmii,clock=ext,fmhz=125,xpcs_mode=2G5
• 改mmcargs为如下:
mmcargs=setenv bootargs console=ttyLF0,115200 root=/dev/mmcblk0p2 rootwait rw earlycon mem=2G
2. 修改设备树
使能gmac1设备,如下图:
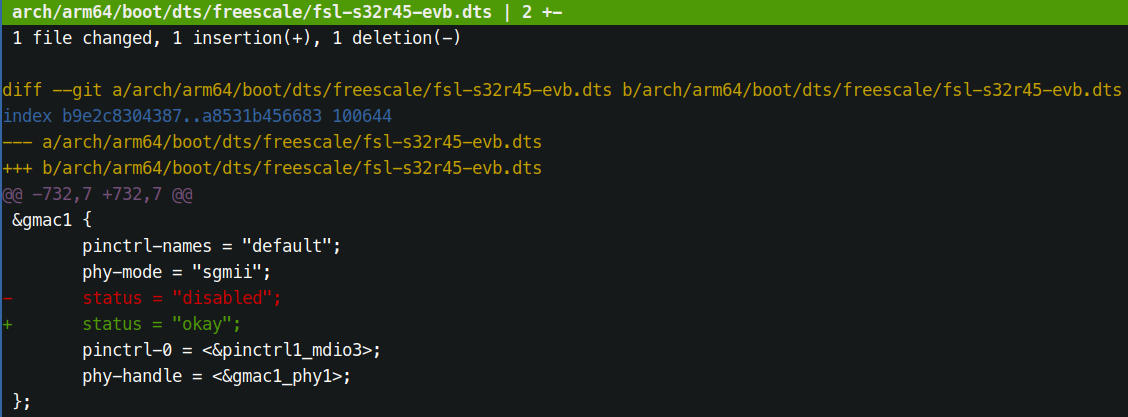
重新编译替换dtb文件。
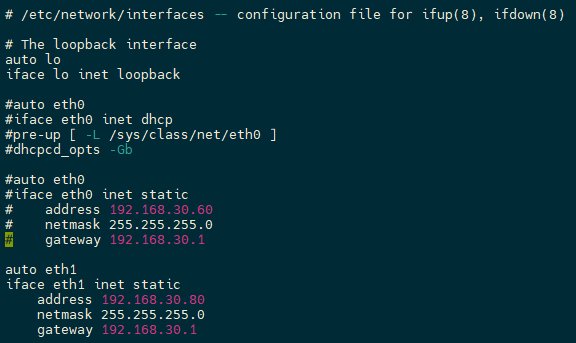
3. 改网络配置文件
系统启动后,改 /etc/network/interfaces 文件,改动如下:
Yocto_User_Manual
Command (step)
cp NXP_R45_meta_sinpro/meta-alb/nxp-setup-alb.sh ./source nxp-setup-alb.sh -b build_bsp32bitbake fsl-image-auto- if you want to compiler some
xxx.bb only, you justbitbake xxx
Ques
- maybe be meet some problem when you first build the image, and you should execute
git config --global --add safe.directory "*"and thenbitbake fsl-image-auto
Notice
- If the driver or files you want to add has no .bb file(
xxx.bb), and you must add axxx.bbfile in the correct directory, for example:bitbake fsl-image-autoand generate the currentosal-kernel-libfolder, and then enterosal-kernel-lib/1.0-r0/git/, and thengit add ., andgit commit -m "111"to record the current commit generated, and now you can add your own neccessary file(./FDMA/fdma_driver_module.c ./FDMA/fdma_driver_module.h and /FDMA/Makefile), and generate the patch file to usegit diff > fdma-add.patch.- add
fdma-driver.bbundermeta-test/recipes-kernel/fdma/fdma-driver.bbsecond - and then add
fdma-add.patchundermeta-test/recipes-kernel/rsdk/files/fdma-add.patch - and next is add
file://fdma-add.patch\intoosal-kernel-lib.bbappendundermeta-test/recipes-kernel/rsdk/osal-kernel-lib.bbappend - and the last you can
bitbake fdma-driverto build thefdma_driver.koonly.
Tips
- If the
m7-sampleadded into project underresources/m7-sampleandresources/arm-none-eabi-10-2020-q4-major-x86_64-linux.tar.bz2, and then you can build them7-sample.bbbybitbake m7-samplegenarate them7-sampleunderbuild_37/tmp/work/cortexa53-crypto-fsl-linux/m7-sample. But if you want to rebuild them7-sample.bb, you must be excutebitbake m7-sample -c do_compile -fcommand to rebuild it. And if you want to change or add some code inm7-sample, you must modified them7-sampleunderbuild_37/tmp/work/cortexa53-crypto-fsl-linux/m7-sample/1.0-r0/gitand then it will be enable to compile to yourm7-sample.bbresults.
OptimizedStrategy
性能提升优化
DVE stage4 和 DOA 颗粒度对齐,流水线化,实现点级并行
- 找到 azi 和 ele 在不同硬件上的执行时间,最小颗粒度(时间3:1)
- 查看倍数关系
- 找到相对应的硬件资源,所需要的硬件是时间的反比(1:3),目的是流水线时间相同,达到最完美流水线
- 优化策略之一可以看颗粒度是否是最小值或者原子
时间优化策略
- 要将一个周期的时间从90ms缩短到40ms以内,您可以考虑以下几种方法和技术模型:
并行处理: 首先,您可以尝试并行处理阶段,以缩短整个周期的执行时间。这意味着同时执行多个阶段,而不是等待一个阶段完成后才开始下一个阶段。您可以使用多线程或者异步编程来实现并行处理。比如,在一个线程中处理阶段1和阶段2,另一个线程处理阶段3和阶段4,最后一个阶段5由主线程处理。
流水线处理: 类似于您之前提到的流水线模型,您可以将不同阶段的任务拆分成更小的子任务,并将它们组合成一个流水线。这样,当一个阶段完成一部分任务时,下一个阶段可以同时开始执行。这种方式可以提高整个流程的吞吐量。比如,可以将每个阶段细分成更小的子任务,使得每个子任务的执行时间更短,以便更快地完成整个阶段。
预处理和缓存: 如果可能的话,您可以尝试预处理和缓存数据,以减少每个阶段的计算量。这样可以在一个周期内更快地完成所有阶段。比如,在每个周期开始前预先计算可能需要的数据,并将其缓存起来,以便后续阶段使用。
优化算法和数据结构: 可以尝试优化阶段中的算法和数据结构,以减少计算复杂度和内存访问时间。这样可以加快每个阶段的执行速度,从而缩短整个周期的时间。比如,选择更高效的算法或数据结构,避免不必要的重复计算等。
硬件加速: 如果可能的话,可以考虑使用专用硬件加速器来加速某些阶段的计算。比如,使用GPU进行并行计算,使用FPGA进行定制化的加速计算等。
综上所述,要将周期时间缩短到40ms以内,您可以尝试并行处理、流水线处理、预处理和缓存、优化算法和数据结构以及硬件加速等方法。具体选择哪种方法取决于您的具体需求、系统资源和技术条件。
并行处理方案
- 在您的情况下,由于每个阶段的输入数据是动态变化的,并且每个阶段都依赖前一个阶段的结果,所以需要特别小心地设计并行处理方案,以确保数据的正确性和一致性。
以下是一种可能的并行处理方案:
数据分离: 首先,考虑将输入数据的采样和阶段处理分开。这意味着您可以在一个线程中负责数据的采样,而另一个线程负责阶段的处理。这样,即使阶段处理的速度比采样快,也不会影响到下一周期的数据采样。
多线程处理: 在阶段处理的线程中,您可以使用多个线程来处理不同的阶段。这样可以并行地处理多个阶段,以提高整个流程的速度。每个线程负责一个阶段的处理,通过线程间的通信(如队列)将阶段结果传递给下一个阶段。
数据缓冲: 在数据采样阶段,您可以将采样数据存储到缓冲区中,并使用互斥锁或其他同步机制来确保在数据被读取之前不会被修改。这样,即使阶段处理的速度比数据采样快,也可以保证阶段处理始终使用的是一致的输入数据。
任务调度: 使用合适的任务调度策略来管理线程的执行顺序和资源利用率。例如,可以根据不同阶段的计算量和依赖关系来动态调整线程的数量和优先级,以最大程度地利用系统资源并确保数据的及时处理。
异常处理: 考虑可能出现的异常情况,如阶段处理时间超过了一个周期的情况。在这种情况下,您可以选择丢弃当前周期的数据,继续处理下一个周期的数据,或者采取其他适当的措施来处理异常情况。
综上所述,通过合理设计数据分离、多线程处理、数据缓冲、任务调度和异常处理等机制,您可以实现并行处理来加速整个流程的执行速度,同时确保数据的正确性和一致性。
整体方案考量
要将整个周期的执行时间缩短到40ms以内,您可以采取以下一些措施:
优化算法和数据结构: 对每个阶段的处理算法进行优化,使得其在更短的时间内完成任务。同时,优化数据结构以提高数据访问和处理的效率。
并行处理和流水线: 利用并行处理和流水线的概念,将不同的任务并行执行,并将整个任务流程划分为多个阶段,使得每个阶段可以并行处理,从而减少整个周期的执行时间。
硬件加速: 如果可能的话,可以考虑使用硬件加速器(如GPU、FPGA等)来加速部分任务的执行,特别是对于计算密集型的任务。
异步编程: 使用异步编程的技术,将部分耗时的操作异步执行,从而不阻塞主线程的执行,提高整体的并发度和效率。
系统优化: 对系统进行优化,包括操作系统的调优、减少系统资源的占用、优化内存和存储访问等,以提高系统的响应速度和处理能力。
并发控制和同步优化: 确保在并发执行过程中的线程安全性,并优化同步机制,减少同步的开销,提高并发执行的效率。
精细调优和性能分析: 使用性能分析工具对系统进行精细调优,找出系统的瓶颈和性能瓶颈,并进行针对性的优化。
通过综合使用以上方法,您可以将整个周期的执行时间缩短到40ms以内,提高系统的响应速度和处理效率。需要根据具体的应用场景和系统需求选择合适的优化方案,并进行深入的性能分析和调优。
LinuxScheduleNote
WaitQueue && wakeup
- https://www.cnblogs.com/sky-heaven/p/7111996.html
- 独占等待和共享等待
1
2
3
4
5
6
7
8
9
10
11
12
13
14
15
16
17
18
19
20
21
22
23
24
25
26
27
28
29
30
31
32
33
34
35
36
37
38
39
40
41
42
43
44
45
46
47
48
49
50
51
52
53
54
55
56
57
58
59
60
61
62
63
64
65
66
67
68
69
70
71
72
73
74
75
76
77
78
79
80
81
82
83
84
85
86
87
88
89
90
91
92
93
94
95
96
97
98
99
100
101
102
103
104
105
106
107
108
109
110
111
({ \
__label__ __out; \
struct wait_queue_entry __wq_entry; \
long __ret = ret; /* explicit shadow */ \
\
//初始化wait_queue_entry类型的变量
init_wait_entry(&__wq_entry, exclusive ? WQ_FLAG_EXCLUSIVE : 0); \
for (;;) { \
/*如果state为可被中断且有挂起的signal信号,返回-ERESTARTSYS
*否则把wait_queue_entry添加到wait_queue_head链表中,并把进程状态设置为state
*这里只更改了进程状态,并没有执行调度。*/
long __int = prepare_to_wait_event(&wq_head, &__wq_entry, state);\
\
//若condition满足,则跳出for循环,在finish_wait把进程状态设置为task_running
if (condition) \
break; \
\
if (___wait_is_interruptible(state) && __int) { \
__ret = __int; \
goto __out; \
} \
\
//cmd即为schedule()或schedule_timeout()或...,在这里触发进程调度
cmd; \
} \
//把进程状态设置为task_running,并将wait_queue_entry从wait_queue_head链表移除
finish_wait(&wq_head, &__wq_entry); \
__out: __ret; \
})
/*
这段代码是一个宏定义,定义了一个名为 `___wait_event` 的宏,它是对等待事件的封装。这个宏包含了一系列的操作,用于在 Linux 内核中等待特定条件的发生。以下是对这段代码的主要解释:
1. `__label__ __out;`:定义了一个标签 `__out`,用于在后面的代码中作为跳转目标。
2. `struct wait_queue_entry __wq_entry;`:定义了一个 `wait_queue_entry` 类型的变量 `__wq_entry`,用于表示等待队列中的一个条目。
3. `long __ret = ret;`:定义了一个 `__ret` 变量,用于存储等待过程中的返回值。
4. `init_wait_entry(&__wq_entry, exclusive ? WQ_FLAG_EXCLUSIVE : 0);`:初始化 `__wq_entry`,设置其标志(`WQ_FLAG_EXCLUSIVE`)表示是否是独占等待。
5. `for (;;) { ... }`:开始一个无限循环,用于等待条件满足。
6. `long __int = prepare_to_wait_event(&wq_head, &__wq_entry, state);`:调用 `prepare_to_wait_event` 函数,准备等待事件。根据 `state` 的值和是否是可中断等待,可能会导致返回 `-ERESTARTSYS`。
7. `if (condition) break;`:如果条件满足,则跳出循环,结束等待。
8. `if (___wait_is_interruptible(state) && __int) { ... }`:检查是否是可中断等待,并且是否有中断发生。如果是,记录中断的返回值,跳转到标签 `__out`。
9. `cmd;`:执行传递进来的命令,通常是触发进程调度的操作,例如 `schedule()` 或 `schedule_timeout()`。
10. `finish_wait(&wq_head, &__wq_entry);`:完成等待,将进程状态设置为 `task_running`,并将 `__wq_entry` 从等待队列中移除。
11. `__out: __ret;`:定义了标签 `__out`,并返回 `__ret`,这里是整个宏的返回值。
这个宏封装了在等待条件满足时执行一系列操作的过程,它是 Linux 内核中等待事件的一种实现方式。根据具体的使用场景,这段代码可能会与其他相关的内核机制和函数一起工作,例如等待队列和调度器。
*/
/*
上面程序的执行过程:
1.用当前的进程描述块(PCB)初始化一个wait_queue描述的等待任务。
2.在等待队列锁资源的保护下,将等待任务加入等待队列。
3.判断等待条件是否满足,如果满足,那么将等待任务从队列中移出,退出函数。
4.如果条件不满足,那么任务调度,将CPU资源交与其它任务。
5.当睡眠任务被唤醒之后,需要重复(2)、(3)步骤,如果确认条件满足,退出等待事件函数。
我在一个程序中因为使用使用wait_event_interruptible()遇到了很大的麻烦,原因就是不知道condition在函数中具体起个什么作用,通过分析源码终于搞清楚。(后面会有专门的文章来介绍那个问题。)
等待队列编程接口:
wait_event(wq, condition)
这是一个宏,让当前任务处于等待事件状态。输入参数如下:
@wq:等待队列
@conditions:等待条件
*/
为每个线程设置name,pthread_setname_np
1 |
|
yocto_user_manual
1.Default Build Parameters Configuration
- open /meta-alb/nxp-setup-alb.sh
MACHINE="s32r45evb"can set the machine defaultSOURCESDIR="NXP_R45_meta_test"can set the default user meta layerLAYER_LIST="meta-test"can add your own meta layer into yocto project- you can replace
DOWNLOADS="$ROOTDIR/downloads"to/home/user/resource/yocto/bsp37/downloadscan set the download dependency resources(linux,bsp,and so on)
F2.loder Introduction and common methods to add hello.ko into image
1 | rsdk-yocto-build-32 tree |
layer.conf
1 | # add next into layer.conf |
packagegroup-test-drivers.bb
1 | # add next into packagegroup-test-drivers.bb |
fsl-image-auto.bbappend
1 | # add next into fsl-image-auto.bbappend |
bitbake hello-test can test the .bb file
basic command:
source nxp-setup-alb.shwill check the and generate the default build folder and enterbuild_test.-doption will generate new build folder and enter it.-boption will choose the special build folder and enter it.bitbake fsl-image-autowill build the u-boot,kernel,rootfs,generate sd/flash image automatic.- u-boot and kernel compiler steps:
- configure cross compile
- excute
make xx_menuconfig,Configure u-boot/kernel - excute
make ARCH=arm CROSS_COMPILE=arm-linux-gnueabihf-,Build u-boot/kernel
3.For example add a new Fdma driver into yocto project
| |–meta-test
| | |–conf
| | | |–layer.conf
| | |–packagegroups
| | | |–packagegroup-test-drivers.bb
| | |–recipes-core
| | | |–packagegroup
| | | | |–fsl-image-auto.bbappend
| | | |–rsdk_env.inc
| | |–recipes-kernel
| | | |–fdma
| | | | |–fdma-driver.bb
| | | |–rsdk - will be add into .bbappend
| | | | |–files
| | | | | |–fdma_driver.patch - and you can generate the patch for osal-kernel-lib.bbappend
| | | | |–osal-kernel-lib.bbappend
| | | | |–rsdk_kmod.inc
| | | |–hello
| | | | |–files
| | | | | |–testhello.c
| | | | | |–Makefile
| | | | | |–COPYING
| | | | |–hello-test.bb
| | |–COPYING.MIT
| | |–README.md
- add your
fdma_driver.patchintoosal-kernel-lib.bbappend - add your
fdma-driver.bbintopackagegroup-test-drivers.bb - add your
packagegroup-test-drivers.bbintofsl-image-auto.bbappend
above all, and you can generate/add a new driver into your yocto image and path is rootfs(lib/modules/xxx/extra/fdma-driver.ko)
if you want to debug your change ,you did not need to rebuild all the sd card image,and just compiler linux image and dtb, and then replace it in sd card
bitbake linux-s32to generate the linux resources and you can add your changed into this,and if the debug is ok ,you can generate the patchbitbake linux-s32 -c do_compile -fwill generate the linux image and dtb only, and the image and the dtb the path isbuild/tmp/work/s32r45evb-fsl-linux/linux-s32/5.15.96-r0/build/arch/arm64/boot/Imageand thebuild/tmp/work/s32r45evb-fsl-linux/linux-s32/5.15.96-r0/build/arch/arm64/boot/dts/freesacle/s32r45-evb.dtb- when you want to generate a patch by Yocto, i suggest you
git add -allthe patch apply changes andgit commit -m "xxx"first, and then add your change into the resources.
Add a compressed package to Yocto’s rootfs
- add
recipes-testintometa-test1
2
3
4
5|--meta-test
| |--recipes-test
| | |--files
| | | |--test.zip
| | |--ziptest.bb1
2
3
4
5
6
7
8
9
10
11
12
13
14
15
16
17
18
19
20
21
22
23
24
25
26
27
28
29
30
31
32// ziptest.bb
SUMMARY = "ziptest application"
LICENSE = "CLOSED"
SRC_URI = "file://test.zip"
SRC_URI[md5sum] = "1234567890abcdef1234567890abcdef"
S = "${WORKDIR}"
do_fetch() {
echo "--- file is in ${WORKDIR} during fetch ---"
ls ${WORKDIR}
echo "--- start load the file to ${WORKDIR} ---"
cp ${FILE_DIRNAME}/files/test.zip ${WORKDIR}
}
do_unpack() {
:
}
do_patch() {
:
}
do_configure() {
:
}
do_compile() {
:
}
// the `etc` is user setting under `/`
do_install() {
install -d ${D}/etc
install -m 0644 ${WORKDIR}/test.zip ${D}/etc
}
Add a file to Yocto’s rootfs
1 | // 0644 used for data file(only read/write) 0755 used for execute file(execute) |
1 | SUMMARY = "txttest application" |